To Btrfs from Hardware RAID
I recently successfully completed a migration of ~4 TB of data from one multi-disk hardware RAID array to a new software array. This article summarizes how I did it with the help of Btrfs. Storage growth was may primary goal. In short, I went from a 4x 3TB disk Dell PERC H310 hardware RAID 10 array with ~6TB storage capacity, to a 6x 3TB disk btrfs v4.1 software RAID 6 array with ~12 TB storage capacity. Both arrays have file systems sitting on top of LUKS for encryption.
Btrfs raid56 profile has known limitations. Use it with caution.
6 August 2016 Update: While this entire article remains valid, I must advise anyone planning to use btrfs RAID 5 or 6 to check the status on the btrfs wiki page, specifically the Raid 5/6 status. Since writing this article, new issues have been found and these RAID levels are considered experimental, i.e., really bad things might happen unexpectedly. I am still using btrfs RAID, but have moved to RAID 10, which has no known stability issues.
As a cool side note, it took only 1 command to make the switch from 6 to 10 (and you can use 10 with an odd number of disks). So despite this issue, I'm still very much a btrfs fan, specifically for this kind of flexibility. And if you're wondering, I never experienced any issues with RAID 6, but based on what I read I thought it wise not to test my luck.
January 2020 Update: Though RAID 5 and 6 remain with a warning for the write hole, critical gaps have been closed and since Linux 5.5 there is a RAID1C3 data profile you can use for metadata to further mitigate risk. If you search around, there are a few articles where people try to corrupt data using a recent kernel version and are unable to. Obviously, use at your own risk, but I am back to using a RAID 5 profile for my local backup server.
But Isn't Hardware RAID The Best?
In 2013 I bought a Dell PowerEdge R520 as my "do everything" home server. I love it. It's great for many reasons. One relevant to this article are its 8 hot swappable drive bays. When I bought the server, I put in 4 Western Digital 3 TB RE drives and created a RAID 10 array, i.e., a 6 TB array. I wanted some ability to recover from a disk failure and the PERC H310 controller doesn't handle parity-based RAID very well (e.g., RAID 5. RAID 6 isn't even an option). I created the RAID 10 array and filled it to nearly 50% capacity with existing videos, RAW images, and all sorts of digital stuff accumulated over the years. Two years later I found myself approaching 70% capacity. As you can't just grow a hardware array, I knew I had some work ahead of me and decided it was time to rethink the array.
Why I Chose Btrfs Over Hardware RAID
Hardware RAID is great in some situations, but I found my situation to not really need it. Moreover, my hardware isn't capable of doing what I want. I have 4 needs:
- RAID 6. RAID 10 is cool, but I don't need that much performance at the cost of 50% of my disks. And as it's a rather small array (i.e., 6 disks max) RAID 6 gives me more than enough performance and resiliency. It's important to note that I have both on-site (2nd server running FreeNAS) and off-site backup with CrashPlan. (If you're new to RAID, be sure to search for articles explaining why RAID isn't backup.) To upgrade to a Dell supported PERC H710 card capable of RAID 6 would cost $500. As I'm not an enterprise, I don't need the super performance (and from what I've read, these days software RAID isn't much different than hardware unless you have big performance needs), so the investment didn't make sense for me.
- Flexibility. Hardware RAID is nice, but once you build an array, it's fixed and you have to destroy the array to grow it (though some simple transformations are possible). You can swap drives in the event of a failure, but that's about it. So if I decide later change or expand my RAID configuration again, I want to do that on the fly in a non-destructive manner. If I have "home server" constraints (e.g., disk sizes that don't match that I'd like to use), I'd like to be able to deal with them.
- Ease of Maintenance. Have you ever used an LSI command line interface? If you manage to find a decent LSI MegaRAID reference, it still is notably painful to use. I want the thing implementing RAID to be very intuitive to use, and well documented.
- Encryption. Full disk encryption is a must, preferably a mainstream approach like LUKS. To be clear, I don't need the file system or RAID controller to do the encryption, but if they prohibit/break the ability to encrypt then it's an issue.
Btrfs offers all of this and much more. Seriously, check out their wiki and the rate of development in the last two years. It's impressive. ZFS was also a consideration, but in short, it's a pain to implement in Linux due to license incompatibilities (and I have no interest in leaving Linux), and from what I've read I fundamentally like how Btrfs is setup compared to ZFS.
Physical Drive Setup: Starting Point
Before we dive into the migration, let me quickly describe the server and its current disk configuration. The Dell R520 is configured for as many as 8 3.5" HDDs. Each disk is controlled by the PERC H310 disk controller. Each disk can be set as RAID (i.e., the controller handles the disks and the OS doesn't know the details), or Non-RAID (i.e., the controller only handles the hardware connection between the drives and the server, but passes through the disk to the OS without abstracting anything, i.e., JBOD).
Physical Bay Layout on an R520
The R520 has two rows of bays. My intent is to use the first two for the operating system, and the remaining 6 for the RAID array.
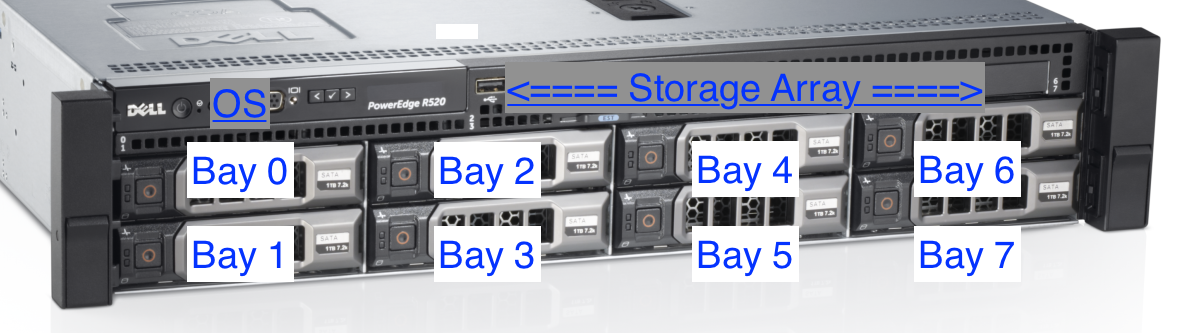
Drives, Current State
- Bay 0: Western Digital RE 1 TB (WD1003FBYZ) - RAID 0 (1 HDD)
- Bay 1: Seagate 1 TB - Not Used (1 HDD)
- Bay 2-5: Western Digital RE 3 TB (WD3000FYYZ) - RAID 10 (4 HDDs)
- Bay 6-7: Western Digital Black 1 TB (WD1002FAEX) - Non-RAID (2 HDDs)
Physical Drive Setup: Desired End State
The goal is to have all non-OS disks be Non-RAID to the PERC H310, i.e., the controller will do nothing more than allow me to attach the drives to the motherboard. All actual RAID work will be done with btrfs software.
Drives, To-Be State
- Bay 0-1:
- Drives: Western Digital RE 1 TB (WD1003FBYZ) - 2 HDDs
- PERC H310: RAID 1 (Mirror)
- Bay 2-7:
- Drives: Western Digital RE 3 TB (WD3000FYYZ) - 6 HDDs
- PERC H310: Non-RAID
- btrfs: RAID 6 (block-level striping with double distributed parity)
The Approach
As I migrate the array, I'd like to do all the work locally on the R520. In other words, I have 2 full backups, but I'd rather not touch them unless I have an unplanned data loss. To accomplish this, I take the following general steps, which are detailed in the remainder of the article:
- Add New Disks and Create Interim Btrfs 6 TB RAID 0 Storage Array: Put 2 new 3 TB HDDs in bays 6 and 7. Create a btrfs RAID 0 array across them, giving me ~6TB storage.
- Copy to Interim Array: Copy the data from my hardware RAID 10 array to the software RAID 0
- Grow/Balance Interim Array to Btrfs 12 TB RAID 6 Storage Array: Kill the RAID 10 and make each disk Non-RAID from the PERC H310. Add all 4 former RAID 10 disks to the RAID 0 array and immediately rebalance to RAID 6
Step 1: Add New Disks & Create Interim Btrfs 6 TB RAID 0 Array
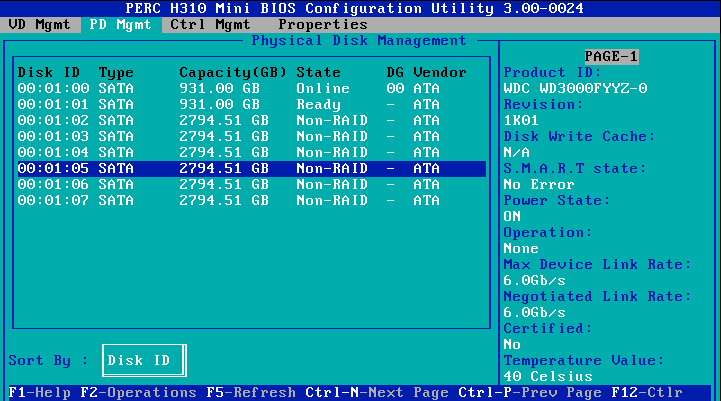
The first step is the easiest, mostly because there's no risk. I'm replacing two old, unused desktop drives with two enterprise drives. I reboot the R520 and press Ctrl-R while it's booting to enter the PERC H310 BIOS. From there, on the Physical Disk Management screen I can see the old drives.

As the R520 has hot swappable drives, I simply remove the old drives, take them out of their drive trays and insert the new 3 TB disks.
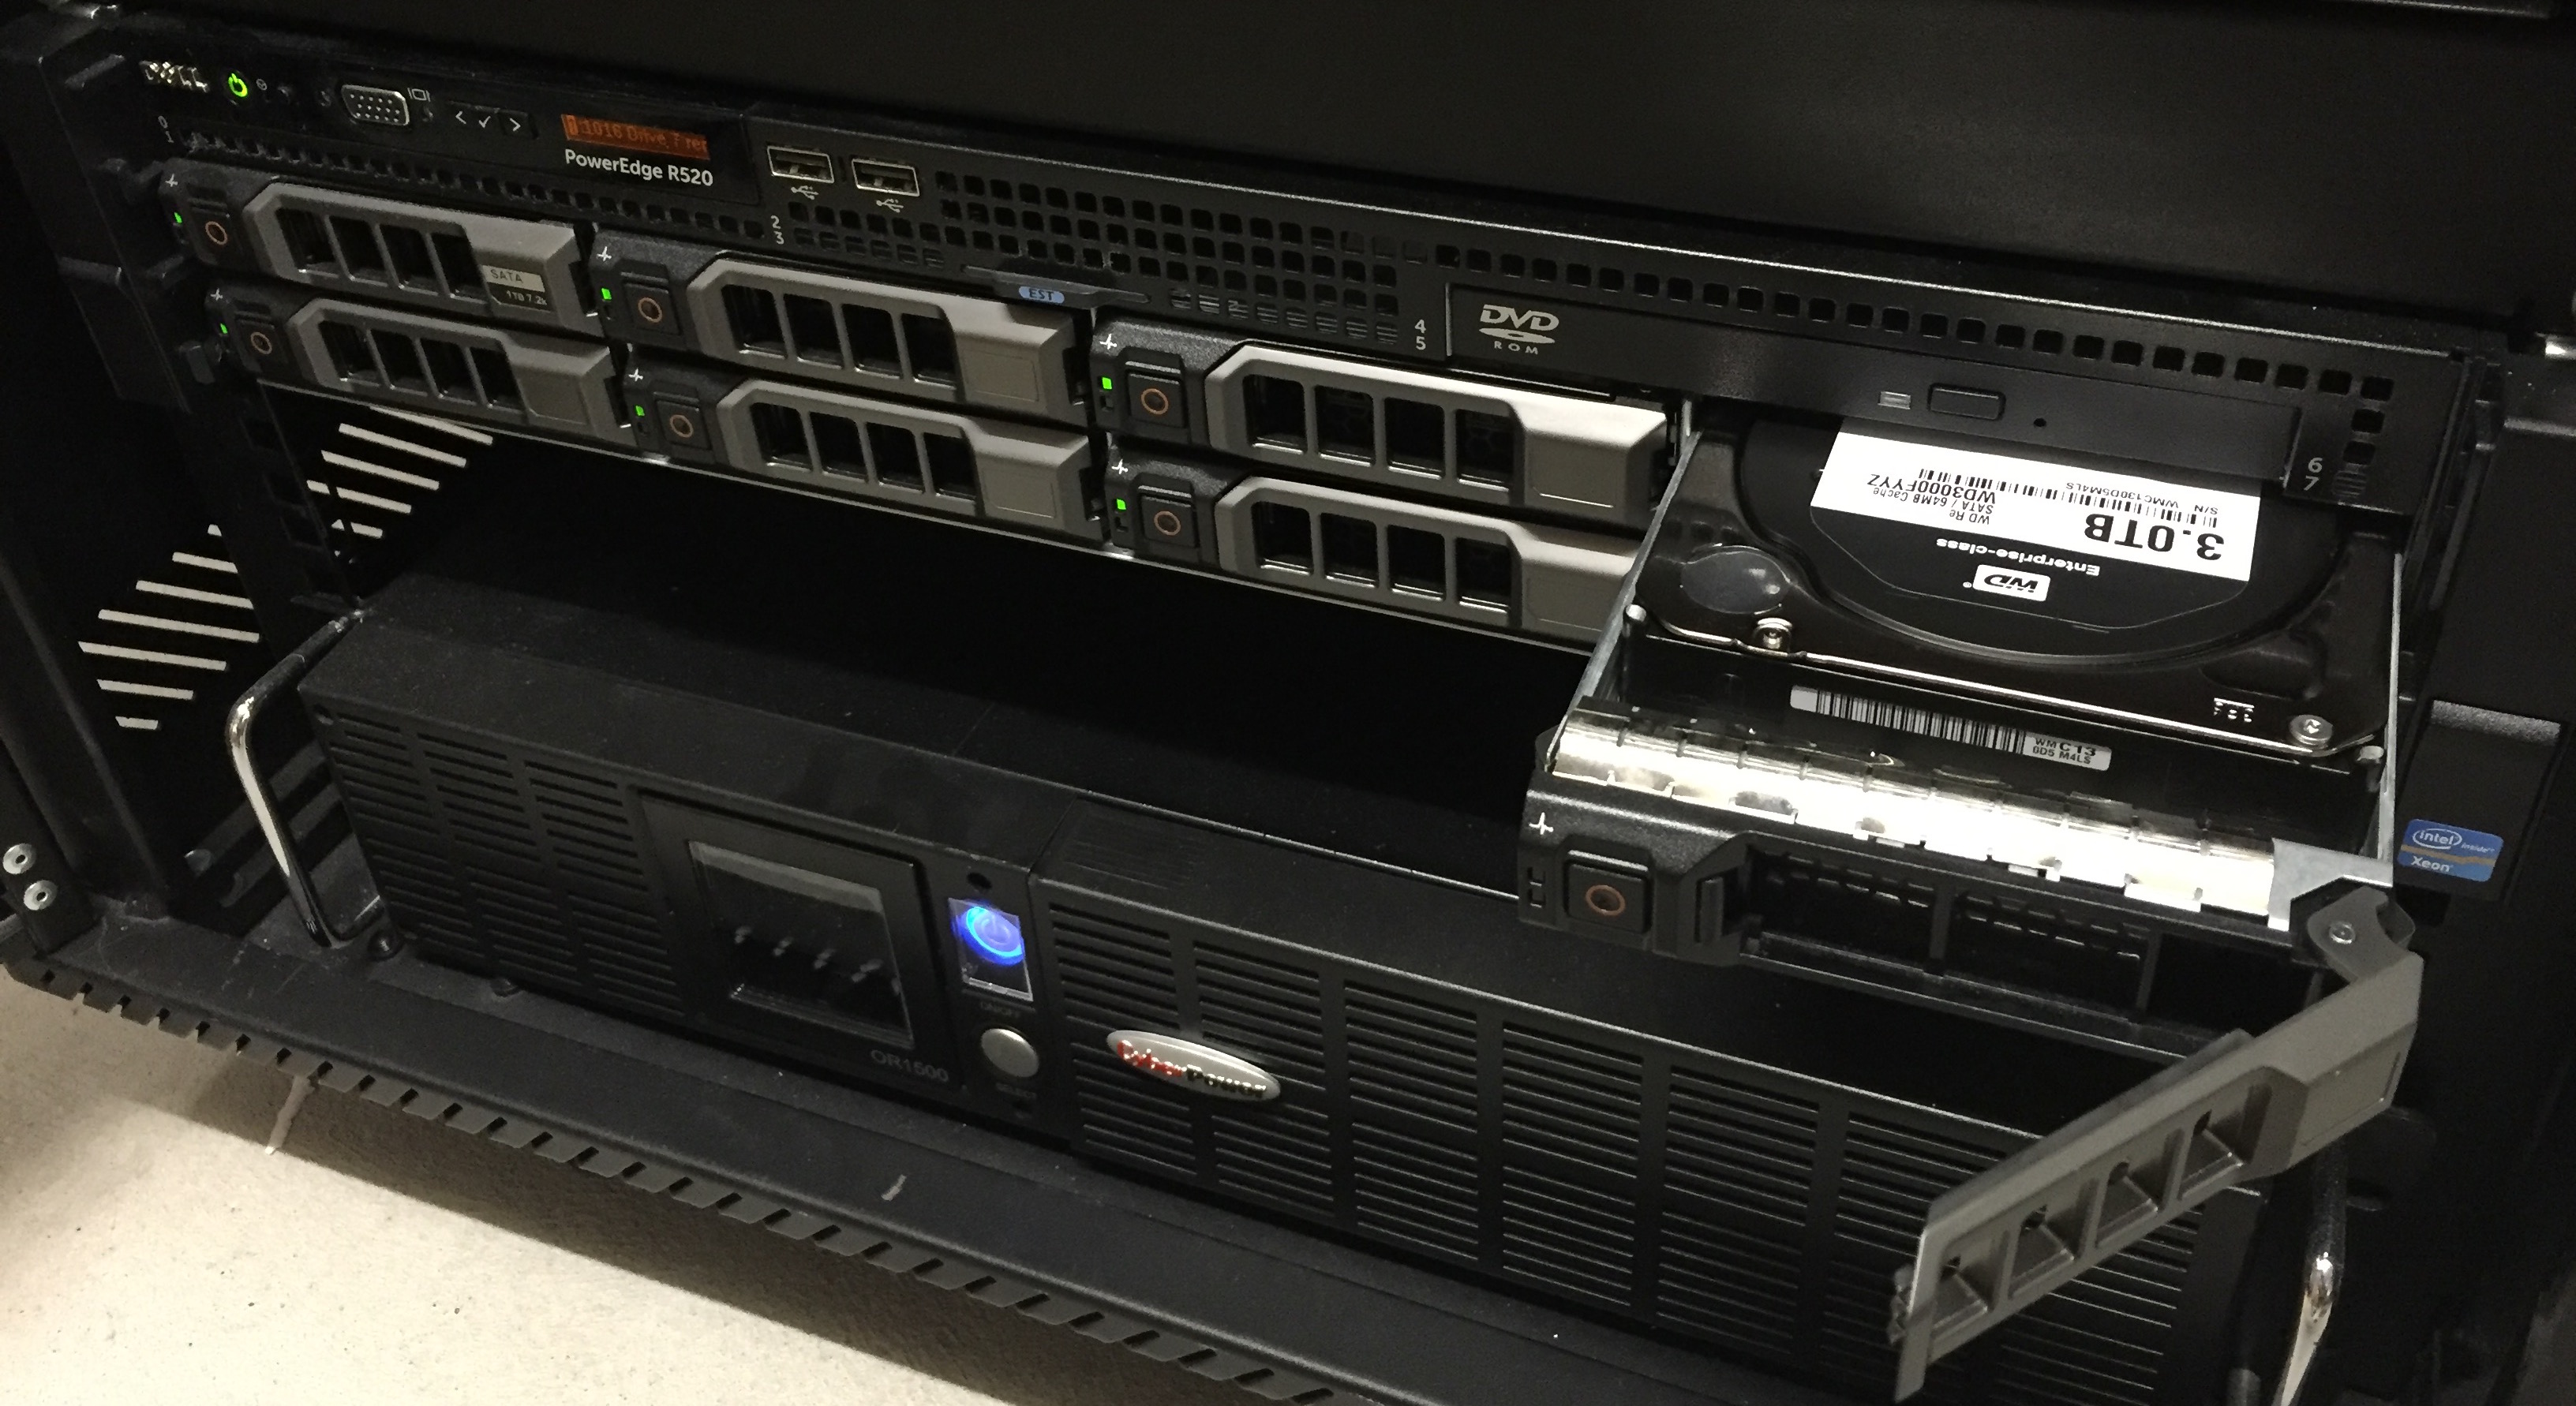
Prior to locking the new disks in, the line items for bays 6 and 7 disappear.
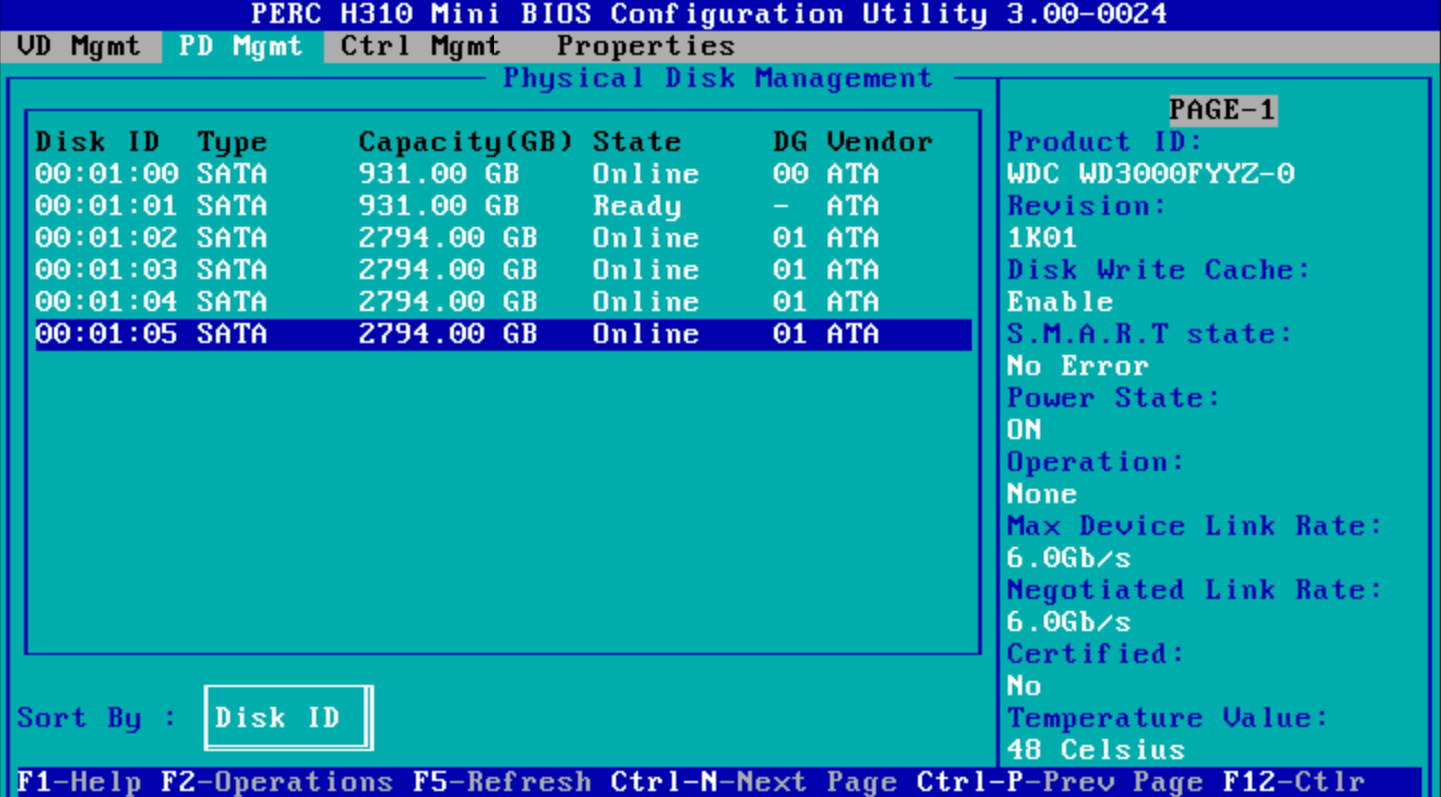
Once I lock the new drives in, they show up in the BIOS. The last step before rebooting is to change them from "Ready" (i.e., ready to be used in a hardware RAID array) to "Non-RAID," i.e., JBOD or pass through.
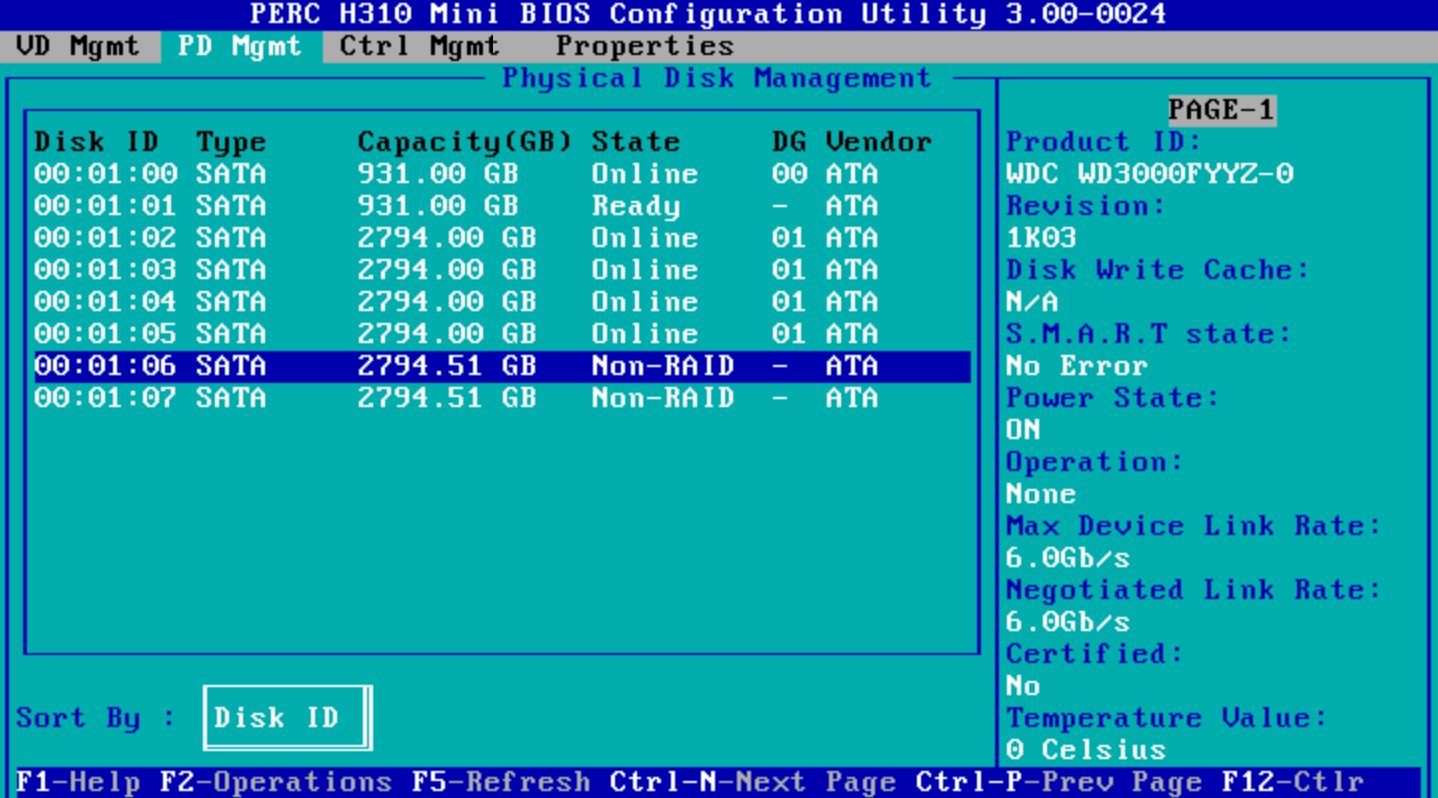
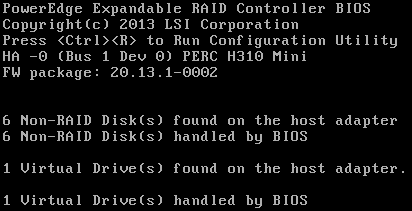
Reboot, and voilà! The 2 new disks are recognized and show up as Non-RAID disks during system boot.

Step 2: Copy to Interim Array
We'll build our new btrfs array in steps 2 and 3. Step 2 is an interim step that allows us to use the new disks to copy data from the hardware array to a new btrfs file system. One of the great things about btrfs is that we can change the RAID level on an online array. So we'll start with a RAID 0 array using our 2 new disks (RAID 0: 3+3=6TB, i.e., the size of the RAID 10 array), and later add disks to it and change it to RAID 6. For most all of the commands noted, you'll need to have root privileges.
Use a tool like fdisk -l or parted -l to identify the two new disk devices (/dev/sda and /dev/sdb in this case). Confirm you've ID'ed the right disks with smartctl. Note: device names can change when you add or remove disks (as we'll see in step 3), so be absolutely sure you know which disks you're referencing.
smartctl -i /dev/sda
 === START OF INFORMATION SECTION ===
 Model Family:     Western Digital RE4 (SATA 6Gb/s)
 Device Model:     WDC WD3000FYYZ-01UL1B2
 [additional output omitted, repeat for /dev/sdb]
Wipe any residual file system header data. This is especially important if the disks were being used previously and have old file system information written to them.
wipefs -a /dev/sda
wipefs -a /dev/sdb
I want full disk encryption. If you want more info on the next steps, see these two references: cryptsetup FAQ, Btrfs Multi Device Dmcrypt. Initialize LUKS partitions on both disks (you'll be prompted for a passphrase, I use the same on all disks as it makes decrypting easier, but if you're paranoid you can certainly make them all different):
cryptsetup luksFormat -s 512 -c aes-xts-plain64  /dev/sda
cryptsetup luksFormat -s 512 -c aes-xts-plain64  /dev/sdb
Open and map the drives. I call mine luks-5 and luks-6 (because luks 1 through 4 is what I'll call the 4 drives we'll add in step 3), but you can call them whatever you like. This will decrypt the partitions and map them to /dev/mapper/[what you named them], e.g., /dev/mapper/luks-5
cryptsetup open --type luks /dev/sda luks-5
cryptsetup open --type luks /dev/sdb luks-6
Create the btrfs pool. I recommend reading up on this command. Of note, this is saying store both data and metadata in RAID 0, label the file system "btrfs_pool" and use the two devices we just mapped above.
mkfs.btrfs -d raid0 -m raid0 -L btrfs_pool /dev/mapper/luks-5 /dev/mapper/luks-6
Mount any device (it doesn't matter which, I went with the first). My existing data on the RAID 10 array is mounted at /mnt/store so I'll create /mnt/newstore as the interim mount point (it's beyond the scope of this article, but it's worth checking out the btrfs mount options).
mkdir /mnt/newstore/
mount /dev/mapper/luks-5 /mnt/newstore/
Side note, play with RAID if you like and bounce between raid 1 and 0:
#### This isn't necessary! Just a cool btrfs feature! ####
btrfs balance start -f -dconvert=raid1 -mconvert=raid1 /mnt/newstore
btrfs filesystem usage /mnt/newstore/
btrfs balance start -f -dconvert=raid0 -mconvert=raid0 /mnt/newstore
btrfs filesystem usage /mnt/newstore/
To enable decryption of these drives at boot, I edit /etc/crypttab. This will be the equivalent of running the cryptsetup open command above every time the system boots. These are fake UUIDs. Find them at /dev/disks/by-uuid.
luks-5 UUID=5aaaaaaa-bbbb-cccc-dddd-eeeeeeeeeeee none
luks-6 UUID=6aaaaaaa-bbbb-cccc-dddd-eeeeeeeeeeee none
I want to mount at boot, so I edit /etc/fstab (again, see btrfs mount options and choose what's best for you, I disabled compression and enabled autodefrag). You can get the UUID of the new array by running "btrfs filesystem show". It's important to use this UUID as the individual disk approach will fail at random if systemd is still trying to decrypt your device when it tries to mount the device.
UUID=7acve5b-d679-4b31-92aa-a1713423babc /mnt/newstore btrfs defaults,compress=no,autodefrag,x-systemd.device-timeout=0 0 0
Woo-hoo! The array is ready for data and will mount at reboot! Before putting much data on the new array, I recommend to reboot once just to feel confident the array will decrypt and mount as expected.
The next step is to copy all the data over. You could use cp, but it's not as verbose and if you have to abort you'll need to start the entire copy over. I find rsync to be the best option as it gives you better insight on progress and can pick up where you left off if aborted.
rsync -avh --info=progress2 /mnt/store /mnt/newstore
This takes several hours depending on exactly how much data you have. Even on these enterprise grade drives operating at at sustained rate of ~140 MB/s it took about 8 hours. So start the process and check back the next day.
Once that's finished, we simply need to confirm that everything we need was copied. There's no reason it shouldn't be, so I just open a few files and do a quick spot check.
Last, I comment out the old /mnt/store lines in fstab and crypttab, and edit fstab to so that the new drive mounts to /mnt/store (and nothing mounts to /mnt/newstore), and reboot. At this point the system operates as if nothing has changed. After rebooting and confirming all is well, I'm ready to tear down the PERC H310 RAID 10 array and reuse its 4 disks.
Step 3: Grow/Balance Interim Array to Btrfs 12 TB RAID 6 Storage Array
The next step is to destroy the existing hardware RAID 10 array to free up the 4 3TB HDDs it's using, add those HDDs to the btrfs RAID 0 array, and then balance it to RAID 6.
Convert PERC H310 RAID 10 to 4 Non-RAID Disks
Find and delete the "VD" or Virtual Disk. (Not to be confused with DG or Disk Group, which in this case also include the VD with the OS on it.)
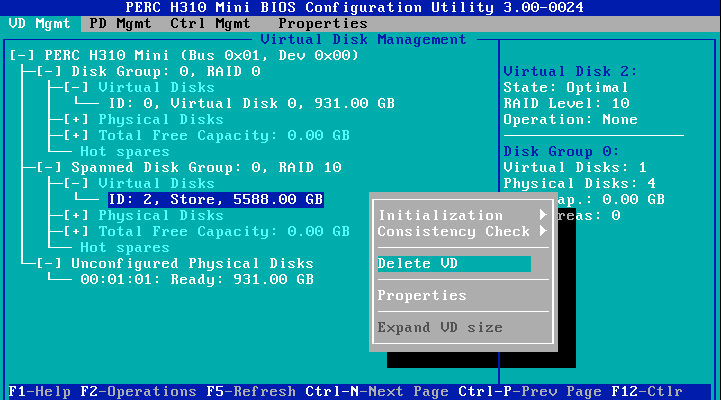
All 4 disks now show as unconfigured in the VD Mgmt tab.
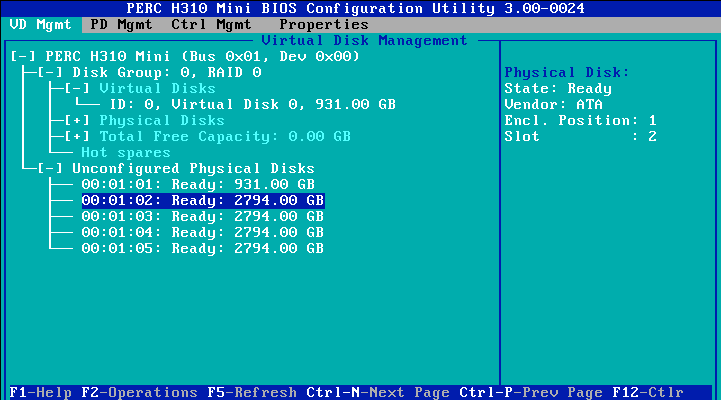
Even though the virtual disk has been deleted, the 4 disks are still "Ready" for usage in hardware RAID and need to be converted to Non-RAID. Converting to Non-RAID is a single action per disk.
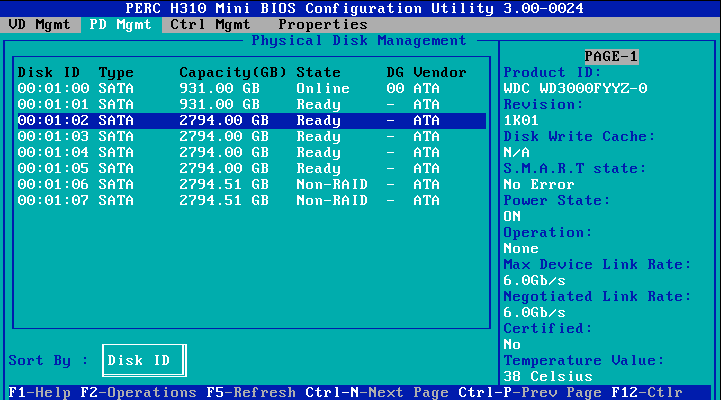
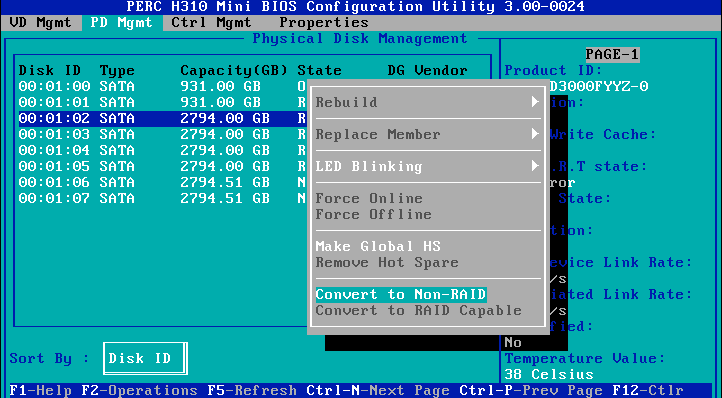
Now there are 6 3TB drives in Non-RAID configuration. As we boot, we now see 6 Non-RAID disks.
Encrypt Disks, Add to Array, and Rebalance Array
Now that we have 4 more disks, we need to prepare them just like we did above. Here are the summary steps for 1 disk. Note: as mentioned in step 2 device labels can changed after a reboot, especially if you've modified the physical disk setup. In my case, /dev/sda is now the first disk that I just freed up (bay 2), but in step 2 it was the first new disk (bay 6). Always check that you have the right disk!
smartctl -i /dev/sda
wipefs -a /dev/sda
cryptsetup luksFormat -s 512 -c aes-xts-plain64  /dev/sda
cryptsetup open --type luks /dev/sda luks-1
[repeat all 4 commands for /dev/sdb /dev/sdc /dev/sdd]
Now the 4 disks are ready to add to the existing array. (Reminder: at this point I've mounted the btrfs array to /mnt/store, i.e., /mnt/newstore is no longer relevant.)
btrfs device add /dev/mapper/luks-1 /dev/mapper/luks-2 /dev/mapper/luks-3 /dev/mapper/luks-4 /mnt/store/
A quick inspection shows that the devices are added, but not yet used. This is good because we want to convert the array before we start writing data.
btrfs filesystem show
 Label: 'btrfs_pool'  uuid: 7acve5b-d679-4b31-92aa-a1713423babc
 Total devices 6 FS bytes used 3.53TiB
 devid    1 size 2.73TiB used 1.77TiB path /dev/mapper/luks-5
 devid    2 size 2.73TiB used 1.77TiB path /dev/mapper/luks-6
 devid    3 size 2.73TiB used 0.00B path /dev/mapper/luks-1
 devid    4 size 2.73TiB used 0.00B path /dev/mapper/luks-2
 devid    5 size 2.73TiB used 0.00B path /dev/mapper/luks-3
 devid    6 size 2.73TiB used 0.00B path /dev/mapper/luks-4
With one more simple command, we start the process to convert the RAID 0 array to RAID 6. All the heavy lifting of moving bits around on the disks just happens.
btrfs balance start -dconvert=raid6 -mconvert=raid6 /mnt/store
As that command takes hours and it's a headless setup for me, I execute it in a tmux session and then use the status command to check in.
btrfs balance status /mnt/store
 Balance on '/mnt/store/' is running
 48 out of about 1804 chunks balanced (59 considered),  97% left
While btrfs does its work the array is fully functional (though a little slower than normal). This took around 8 hours for my array.
While this is happening, I take one final step and update /etc/crypttab to include our new disks.
# add 1 line per disk, the UUID is at /dev/disks/by-uuid (ls -la)
luks-1 UUID=1aaaaaaa-bbbb-cccc-dddd-eeeeeeeeeeee none
luks-2 UUID=2aaaaaaa-bbbb-cccc-dddd-eeeeeeeeeeee none
luks-3 UUID=3aaaaaaa-bbbb-cccc-dddd-eeeeeeeeeeee none
luks-4 UUID=4aaaaaaa-bbbb-cccc-dddd-eeeeeeeeeeee none
luks-5 UUID=5aaaaaaa-bbbb-cccc-dddd-eeeeeeeeeeee none
luks-6 UUID=6aaaaaaa-bbbb-cccc-dddd-eeeeeeeeeeee none
Now we are reboot ready. That said, it's probably best to leave the server alone until the balance is complete.
When it's all done, I can see the glorious 12 TB of storage I now have available. Hopefully this lasts for a long, long time. That said, when it's time to tweak I'm sure btrfs will make it quite simple.